Tuesday, February 28, 2012

Clean and Simple card

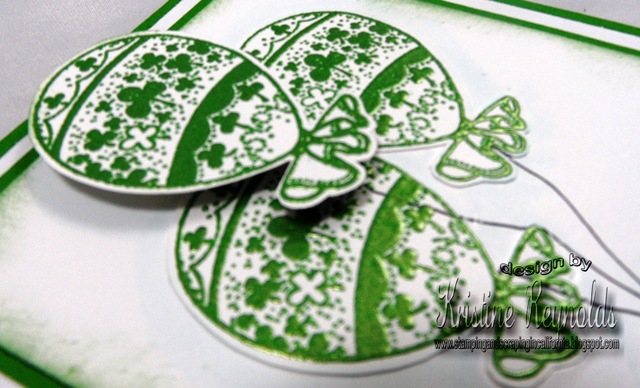
Kristie here today to show you a card I made using "Shamrock Border" (#40502) and "May your Luck" (#13504) stamps both from
I stamped the "Shamrock Border" onto green ribbon with green ink.
I have to apologize for the quality of he photo, I could not get a good picture of the ribbon no matter how I try.  The shiney-ness of the ribbon just wouldn't let me get a really nice picture without glare.
I ran the ribbon through a Xyron and adhered it to off white card stock.

The "May your Luck" sentiment was stamped onto off white card stock and trimmed then layered onto kraft card stock.
Then it was all layered onto a kraft card stock base.

Dash lines around the outer edge of this card finishes it off.
I love the clean and simple look of this card and hope you do too.

Thank you for stopping by today, come again soon.
Don't forget that St. Patrick's Day is coming soon and Eureka! Stamps has a lot of great images that would be perfect for your cards and scrapbooking layouts.

Monday, February 27, 2012

Super Simple Scripture Card


I just finished selling cards at local college. One of the professors there had a mother with Ahzheimer's or some other form of age-related dementia, and so she wanted cards with no embellishments that her mother might mistake for something such as candy and peel off to eat. She also wanted scripture cards with large letters. So, I tried to include a couple of embellishment-free scripture cards each time. This is one that involved a series of coordinated papers, which I cut or punched in various shapes to make this card. The circles seem a bit reminiscent of door knobs, which go well with this scripture.

Friday, February 24, 2012

Quick Cards & Sayings

Today's focus is on the sayings and they are available at Eureka Stamps in both rubber and digital.
All three cards can be created quickly using tools and accessories and the only stamps used on all three (rubber or digital) are the sayings.


The ribbon was hand tacked with needle and thread at each fold and the ends of both the ribbon and thread were taped to the back of the panel.

You can find the flower at the QKR Stampede store site in a large variety of colors.
Paper: The Paper Company – black, red, Bazzill – white textured
Ink: Computer ink
Accessories: Copics for the tiny flowers, QKR Stampede flowers, Making Memories brad
Tools:  Perfect Layers tools from PerfectPaper Crafting, EK Success corner rounder, sanding block to smooth punched edges, Spellbinder Shapeabilities Flower Creations 3 die, Cuttlebug and D'vine Swirls embossing folder, Bazzill piercer for brad

**********

The butterflies were attached with Aleene’s tacky glue and Stickles was using for a little sparkle in the openings.

The pearls were attached with Aleene's Paper Glaze

Paper: unknown smooth white, K&Company designer paper
Ink: Stampin Up – Lavender Lace
Accessories: pearls, Aleene’s Paper Glaze and tacky glue, Stickles
Tools: Cherry Lynn butterfly die, Nestabilities – Lacy Squares die, Martha Stewart border punch, Scor-Pal

**********

This quick card was created with die cuts, punches and ribbon.
Paper: unknown textured white cardstock, Creative Imaginations designer paper
Ink: Memento – Tuxedo Black
Accessories: Aleene's Paper Glaze and tacky glue, heavy carpet tape for popping up the flower and panel.
Tools: Cuttlebug - Asterisk and Tiny Tags die, EK Success - heart buckle, corner rounder, stamp positioner for sentiment 

Thursday, February 23, 2012

Bluebonnets..and MIA..

Hello! This is Jessica B. with a card for Eureka Stamps today. In case you don't remember me I am actually a DT member and not a blog jacker..LOL. I do appologize for the no-posts this month but it was truly unaviodable. I have been very ill plus had a couple of sick kids too...add all that up and you get ...nada..

I am starting to feel a bit better though and am trying to get caught up with my blog and my posts for the company blog..may take a while but I will get back in the swing of things.


I chose this adorable stamp for my card. I love bluebonnets..they just scream spring to me..and I sure could use a little sunshine and warmth these days! I must say this card came together  pretty easily. That is the great thing about good stamps..if the stamp is good.you shouldn't have to do a whole lot unless you just want to! If you haven't stopped by the store recently..please do! You will find this wonderful springtime image plus a gazillion more to suit all of your card making or crafting needs!

I stamped the image in Archival sepia ink and colored with Prismacolor pencils and OMS. I layerd it onto a square piece of card stock then onto a slightly distressed piece of dp ( SEI) and onto a premade K&Co card base. The cute little butterfly brad is from Anna Griffin..I found it in my stash...and it matched perfectly!


I wont make this a long post today, but just  know I will be back regularly ( bar a catostrophic event ;))..hope everyone is well and having a fantastic day!

Friends

Hello crafty friends!

Kristie here today to show you
  a card that I made with
"Secrets" (#14312) and
"friends" from the "friends" sheet of words (#46202)
This sheet contains 5 different words.
Both stamps are from QKR stampede.
I stamped the "Secrets" onto water color paper and colored it with water color crayons.
I fussy cut the "friends" that was stamped onto kraft card stock.
The little hearts are from an EKSuccess border punch.
Thanks for stopping by today. I hope you'll come back soon.
Leave a comment if you wish, then why not check out the
QKR Stampede shop and see all the fabulous images offered there.
There is something for every occasion and
they carry both rubber and digital stamps.
Something for everyone!

Wednesday, February 22, 2012

Eureka! Wrapped up kitty and puppy


Hello ~ today's card features
 a stamp from
 Eureka! Stamps.

It is called 


I stamped the image onto watercolor
 paper and colored with my 
Tombow markers and blended
 with a blender pen.

Thanks for stopping! 
See you next time!
Barb

Rocking Horse - Biblical Impressions


Today's card features the Biblical Impressions
 stamp called "Rocking Horse".
I thought this was such a cute image! 
It would be great for a baby or child's card!

Image was stamped on watercolor paper
 and colored with Tombow markers.
Thanks for visiting today!
Stop by again!
Barb

Tuesday, February 21, 2012

Trust in the Lord


I enjoyed making this card, but photographing is usually a challenge, primarily with embossed cards; getting true color and clarity is the issue. So, the text is actually more readable than you see here.I love this image, and it's a wonderful background for Eureka's large scripture stamps.

First, I embossed the Baroque background image in gold. I cut the panel to 4" x 5.25", trimming off at the top and right sides. I used a craft knife to cut around the one corner that seemed like it would work for this. The vellum was a "sky" vellum; a white/blue cloudy vellum. I'm sorry, I have no idea where I got it.

When I went to affix the Proverbs 3:5,6 stamp to the acrylic mount, I realized that it had been mounted on some faulty EZ mount foam I had gotten years ago, which mysteriously shrunk. I've never had that problem since, and the company had replaced the foam, but evidently I had not used this stamp since then. So, in order to get the edges of the image (I tend to cut right down to the text) on the cardstock, deliberately performed the no-no of tilting the stamp in each direction. If you look at the image on the website for this stamp, you'll see that the letters are not all solid, as this card shows them to be. However, because of using the translucent vellum, I think this makes for a more readable card, so I would actually recommend tipping the stamp, or using a less translucent vellum.

For the upper right corner, I embossed the background image a second time, then cut out from the same area that I used the craft knife on; if you look closely at that bottom left corner, you'll see what I used. However, Eureka has a Filagree corner that I would have used had I owned it. (There is also a coordinating Filagree border and Baroque square).I took an ancient Sanford gold coat pen and faintly edged the background before affixing to the card. I think it would have also looked nice to emboss the edges.

Monday, February 20, 2012

Stained Glass Wannabe...

Ok...so I had this vision to create a "stained glass" looking card. Started out great! Loved the way it was going. Then I got stuck...and am not thrilled with the results, but kinda like it. It was all good until I got back to the project and found it all curled up (since it was vellum and I used glue and H2Os on it). So then I started at it and wondering where to go next. Also, silly me, forgot to take a picture of the back of the vellum before mounting it. The back is what looked pretty cool, and would have showed you how much work when into it...lol. Well...here is what you get instead....and a close up of the edging...
So I started by stamping the Daffodils stamp from Biblical Impressions onto vellum. I then used a glue pen and glitter to fill in some of the areas. You can see that I used different color glitters on the flower. I used some twinkling H2Os for the stems and leaves. Then when you flip over the vellum to the "other side" the colors show through. (Again, I totally should have taken a photo before I mounted, but yeah...that slipped my mind.) Like I said, when I came back to the image after letting it dry, it was a bit curled up. So I needed to change my mounting plan. I decided to use scor-tape to hold it down. I picked a wider tape so that I could use black glitter around the edges to look like the molding of the stain glass. AGAIN...epic fail...couldn't find the black glitter...lol. So I went with black embossing powder. Honestly...I loved the results of that. The way it melted looked more "realistic", so I went with it. Then came the tricky part...what to do next. So I went simple, and just mounted that onto some purple CS, and said...IT IS DONE! I would have liked to have added a sentiment somehow, but ran out of space. Overall, it is very pretty and different. It could be used for some many different occasions also. Well thanks for stopping by, and have a fantastic day!

Pot of Gold

Hi there. I hope you are all enjoying your Monday so far. Here in the US it is a holiday...plus my kids have the entire week off of school too. They of course are off skiing...lol. Well, today I wanted to share a card with you that I made using the Lg. Pot of Shamrocks stamp from Eureka Stamps. I stamped the image and fussy cut it out. Then I added some gold stickles to the handle, and colored the shamrocks green. I felt some of the shamrocks needed to sparkle, so I added green stickles to some of those. I layered the pot onto 2 different shades of green CS, and then onto a green PP that I "stole" from my DD's paper stack (psss...don't tell her...lol). Then I found some scraps of green ribbon. I wanted to put a bow on, but there wasn't enough ribbon left, so I just put the 2 pieces on the paper instead.
Well that is all for now. I will be back in a bit with a card I made with a card I made with a Biblical Impressions stamp. However I decided to make it a little more "elaborate" then I originally intended, so it had to sit and dry before I mounted it...lol.

Saturday, February 18, 2012

Mittens!

Don't you just love the sweet mittens from Biblical Impressions!  I used 84202 - Mitten Line and paper pieced them to match my design papers.
You can find so many cute winter stamps and many more at Biblical Impressions as well as QKR Stampede and Eureka Stamps.

Thursday, February 16, 2012

Happy Birthday! The QKR February Blog Hop

Happy Birthday!
 Welcome to the February Blog Hop for QKR Stampede.
This month we are celebrating birthdays, after all we all know someone who has a birthday now and then, right?
There are tons of images in the QKR Stampede shop that can be used for birthday cards and projects.
Our Design Team and a few guests have some inspiration for you, so let's get started.
If you get lost along the way, or one of the links doesn't work, hop on back here, all the participating blogs are linked below.

Your first stop will be with:

then you will hop on to:

 
Be sure to come back here and let us know what you think of our hop. 
Stop in to the
QKR Stampede store
and see what wonderful images you can use for birthdays and many other occasions.  You will find rubber and digi stamps alike, so there is something for everyone.
Thanks for hopping along with us!

Lucky Leprechaun

Happy Thursday!

Valentine's Day is over and  so we move on to the next holiday....

St. Patrick's Day!

I am not Irish and don't really celebrate the holiday anymore...since the green beer days in college....but I do love making cards with this adorable Large Leprechaun from Eureka Stamps St. Patrick's Day Selection of stamps.


The glittery shamrock stickers are from Hobby Lobby.  I don't remember where I got the paper because it's been in my stash for a while but there are lots of cute themed papers at your LSS.  I colored the image with copic markers.

i hope you'll go check out all the great rubber stamps at Eureka Stamps.  And...they are all available in digi too!

Thanks for stopping by.  

I appreciate it!

Kristine
Good Morning
Today I am sharing a card made using digi stamp


I have coloured the image using copic sketch markers & teamed it with these rather fun papers from Nikky Sivils adding a few wraps of bakers twine & a really nice metal thank you sentiment. 
I do hope you enjoy my card today and don't forget to check out the store for a vast selection of rubber and digi stamps.

Tuesday, February 14, 2012

Lovely Tulips From Biblical Impressions

Hello Friends! 
Today I am thinking spring with this cute stamp 
from Biblical Impressions called Tulips.
I colored the image with Tombow markers. 
I am really starting to like my Tombows! 
I have had them forever and I am 
finally starting to use them!

Papers are from Bazzil 
and We are Memory Keepers.
The official stamp name is 
Tulips # 31705.
You can find it right 
Thanks for visiting today! 
Make it a great day!

Barb

Happy Anniversary!

Hi stamping friends!
Kristie here today.
Today I have an anniversary card to show you.
Our anniversary is coming soon and my husband and I love Ireland and Celtic designs, so I thought the
"Shamrock Border" (#40502) from Eureka! Stamps
would be perfect for a card for him.
The "Happy Anniversary" (#9004) also from Eureka! Stamps,
was perfect for this card.

For the green area of the card, I tore a piece of paper and laid it over the white card stock. I used green distress ink to ink over the paper.
The "Shamrock Border" was embossed with gold embossing powder onto a separate piece of card stock then adhered to the card.
The Happy Anniversary was also embossed with gold powder.

To finish the card off, I used some gold thread and wrapped it around the top of the card.
I think my husband will like this card, I hope you do too.

Thanks for stopping by today, leave a comment if you like and be sure to check out Eureka! Stamps and see what wonderful images you would like to work with.

Monday, February 13, 2012

St. Patty's Day Eureka Blog Hop


St. Patty's Day Eureka Blog Hop!


Welcome to this months Eureka Stamps Blog Hop!

This month we are celebrating 
Clovers, Leprechaun's and all things Lucky!   

Eureka Stamps  has a ton of awesome images available in unmounted red rubber and in digital and you are sure to be inspired to create something special for your loved ones after you hop through all the fabulous creations that our Design Team has created for you.


Here's a fun card to start you off using stamps from the Balloon Holders.


I embossed the sentiment and the balloons.  Here's a closer look.


Stamps:
St. Paddy's Balloon by Eureka Stamps
Boy Balloon Holder by Eureka Stamps
Paper:
Neenah White card stock
Bazzill Basics card stock
Ink:
Memento Tuxedo Black die ink
Versamark watermark ink
Copic Markers
Other:
Jade Pearlustre embossing Powder by Stampendous
pop dots
Green brads

If you are looking for more St. Patricks Day inspiration you'll want to check out this months Blog Hop!


Here are all DT members participating:


Happy Hopping!

Saturday, February 11, 2012

Happiness Is Like A Butterfly

Happy Saturday! 
Today I am sharing a couple stamps from Eureka with you... The quote is 40403 Happiness Like a Butterfly and the 3D Butterfly is 29401 Butterfly Pattern. These two stamps work so well together and the 3D pattern butterfly looks so real. A quick and easy card hat turns out beautiful

Friday, February 10, 2012

Valentine Cow

If you look close at all the markings on this cow from Eureka you’ll notice they are hearts…perfect for a Valentine but it also will work for the everyday card.
I used Copic markers to color the images: cow – 100,110,C7, C2,1,0,00, R81,83, flowers - E25,27, Y35,38, grass and stems and leaves – G07,09,28
The clouds were created with a sponge and my hand cut template, here’s a direct link to a free pattern. I did a drag motion starting on the template and dragging off onto the cardstock. It’s such a quick way to add a sky to the scene.
If you look at the cow image linked below you’ll notice there are just stems in the mouth, I used a stamp positioner to aid in stamping on the blooms. I masked off the rubber image to ink up just the bloom I wanted to stamp.
I used the Perfect Layers tools from Perfect Paper Crafting to cut the even layers.
Scor-Pal was used to emboss between the outside black border and Martha Stewart punched border.
The sentiment is a digital image cut out with Stampin Up’s Word Window punch.

The border punch is from Martha Stewart.

Images: Eureka Stamps -28601 Valentine Cow, 14704(235) Flowers Border, digi13301 Be Mine

Paper: Remember When black textured, The Paper Company pink and textured white for border, Beckett Expressions Iceberg for image
Ink: Memento – Tuxedo Black, Stampin Up – Bashful Blue, computer ink

It's A Love Thing! Biblical Impressions February Hop

Hi there and thanks for stopping by. You are just in time for our monthly Biblical Impressions Hop! here is just a little snippet of the eye candy that awaits you!
here is the hop order, make sure you stop back by and leave a comment to let us know what you think!

Now on to your first stop Karen

Happy Hoppin'

Thursday, February 9, 2012

Bookmark

Hello stamping fans!

Today I'd like to share with you, a bookmark that I made using

"Rose Border" (#15411) from QKR Stampede.


I stamped the image onto watercolor paper and colored it with water color crayons. I then fussy cut it, adhered it to some yellow patterned paper, fussy cut it again and adhered it to yellow card stock then to black card stock.

I punched a hole in the top with my Crop-a-dile and used some 'baker's twine' to make a tassle.

This is an easy way to make a cute little gift for someone who loves to read.

Thanks for stopping by today, leave a comment if you wish, then go visit the QKR Stampede store and see what images you would love to work with.
We hope you'll come visit again soon!


Wednesday, February 8, 2012

Eureka! Heart Bouquet

Todays card features two
valentines stamps from Eureka!


I used the same papers from 
We are Memory Keepers 
that I used with my Ice cream sundae card. 
I paper pieced the bow to add a little dimension.
I used colored pencil to color the design. 
Thanks for visiting today!
Hope to see you back here soon!
Barb

Tuesday, February 7, 2012

Grace and Peace - Boy did I need it.

Its been a little while since my last post due to some rather upsetting things happening at home. I apologise for this.

When I picked up this rather huge stamp which was a bargain at only $6 ... here is the direct link to it http://www.biblicalstamps.com/proddetail.php?prod=37803

I sat and read it and smiled... I forgot to take everything to Him... He offers Grace and Peace as a promise and I decided that I would make up a wall hanging to remind me..


I used  Pretty Paper, white stamping card-stock and some rather delicious Dies.

The Stamp works a treat. I sometimes have problems with large stamps that only stamp in places or over stamp in other sections.. this one works a dream!!! it is soooo deeply etched that I stamped once and that was the image I got.... in perfection and without a single smudge, miss stamp or smear.

Some things in life really make me smile!! and working stamps are the best things EVER!!!

I stamped the image using Memento Ink in tuxedo black onto white cardstock. used Stormy Sky mixed with Peeled paint Distress ink pad  to colour the edge and mounted it onto the back layer... the result is this.... I LOVE IT

I added some small flowers to the edges too in white. I was going to make it as my Bible marker but worried that I would forget it was there and would be tucked away until I picked up that particular page I had marked.

Here is a close up at a jaunty angle ;) I love a jaunty angle lol...


Karen xx


The uniqueness of a snowflake


I know, I know, snowflakes are white, and winter skies are blue! But as soon as I saw these stamps from Eureka, I knew I wanted to do pink and brown. No logical reason just pure whimsy! Actually, I had some Distress Embossing Powder in Tattered Rose (the ink color used), and my plan was to emboss the snowflake. But mystery of mysteries, it was nowhere to be found. I was really, really set on using the powder, so I literally searched for days, even though I could not afford the time. I never did find it, but my stamp room is a bit more organized at least! Last minute, I thought of the pearls, which of course, makes my non-conformist card all the stranger. And to top it all off, my husband informed me that snowflakes are hexagonal, not octagonal!

The snowflake may be found HERE, and the text is HERE.

Monday, February 6, 2012

Class Valentine's Set 2...

So here is class Valentine's Set 2....well 1/2 of set 2. I used 2 different stamps for this set. Both from Biblical Impressions. For this set, I used the Swirl Heart stamp and the Valentine sentiment stamp. ...and a close up... I stamped the hearts twice on these with pink ink, and then the sentiment with purple ink. Like the last set, the papers were already cut, so it was really quick to whip off for me. I will share the rest of this set with you later this week during the Biblical Impressions DT Blog hop. Thanks for stopping by!

Class Valentines

Today I wanted to share class set #1 of my daughters' Valentines. I have to make 3 class sets, and of course they all have to be different...lol. The nice thing was I already had the papers all cut for a different project that I have since scratched from my to-do list. So...that part was easy. I also thought it would be fun to not color the images so that my DDs can color them before giving to their friends. So...for set number 1, I used the adorable Hearty Dragon stamp from Eureka Stamps.


So that is the class set...and here is a close up... Super cute! Love this stamp. I stamped them on cream CS with purple ink. Then I used a pink ink to stamp the Happy Valentine's Day stamp (also from Eureka Stamps). Next was some quick mounting, and all set! Actually my oldest DD helped me mount them all onto the purple CS base. She did a really good job centering them too! Now I will just have my youngest DD write her name on the back and they are ready to pass out to her friends next week!

Saturday, February 4, 2012

What A Buck!

My husband would say if he saw this in the woods...haha. Biblical Impressions has some awesome wildlife stamps to make masculine cards with. I used 34403 Buck In The Forest. He looks like he is right here among the aspens in Colorado

Friday, February 3, 2012

ICTHUS


I love this image from Biblical Impressions (scroll toward bottom of page). This fish symbol is sort of an ancient times acronym; the letters stand for Greek words that mean Jesus Christ, Son of God, Savior. Shortly after the time of Christ, intense persecution was inflicted upon Christians by the Roman Empire, and this symbol was a way of communicating with another believer that they were in like company, and could be free to talk of their faith.

I used twinkling H2O's to color, though when doing the earth toned fish, I realized that I did not have enough colors. So, I used markers, then lightly brushed a neutral H2O over the spaces so that they would have the same glimmer. I'd recently been deploring the lack of nice magnets on our refrigerator, so the smaller ones I mounted onto dominoes, and attached to magnets.


Thursday, February 2, 2012

Anniversary Tree

Happy Thursday!

Can you believe it's February all ready?  

What happened to January?

I'm not sure but it sure went by FAST!  If you still have some Valentine's Day cards to make you might want to get this fun Heart Tree from Eureka Stamps.

It's available in red rubber and digital and is perfect for many occasions including Valentine's Day, Birthday, wedding, and anniversary.


To make this card you need:
Stamps:
Heart Tree by Eureka Stamps
Happy Birthday by QKR Stampede
Paper:
Bazzill Basic cardstock
Neenah white cardstock
Ink:
Memento Tuxedo Black dye ink by Tsukineko
Copic Markers
Other:
Spellbinders label die
Red Brads

Thanks for stopping by to check out my project!

Have a fabulous rest of your day!

Kristine